Independent Review Notice: All product recommendations are selected independently by our team. We may earn an affiliate commission when you purchase through links on our site.
The Starlink dish gets all the attention, but the Starlink app is where the system actually lives. Every alignment decision, every obstruction problem, every firmware update and every snow-melt setting runs through it — and if you know how to read it properly, the app will tell you exactly which accessory your setup needs next. This guide walks through every screen that matters, then pairs each workflow with the tools and accessories that make it easier.
| Product | Best For | Key Features | Price |
|---|---|---|---|
 | Best for Alignment Checks - Adjustable Aluminum Tablet Stand |
| Check Price on Amazon |
 | Best for Field Setups - 20,000mAh USB-C Power Bank |
| Check Price on Amazon |
 | Best for Snowbelt Users - App-Controlled Snow Melt Reference Card |
| Check Price on Amazon |
Installing and Pairing the App in Under 5 Minutes
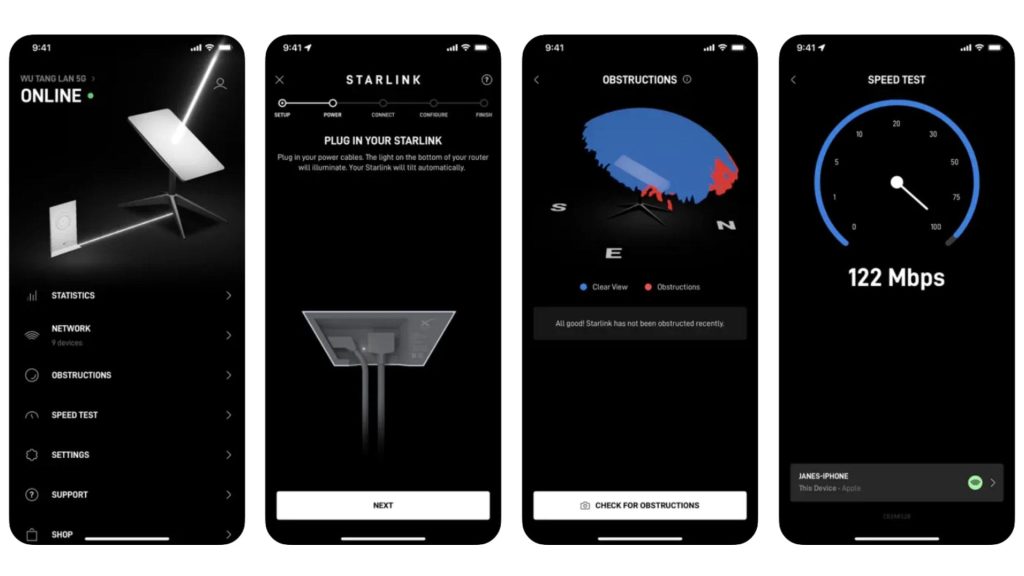
The Starlink app is free on iOS and Android, and one account can manage multiple dishes — useful if you run a home dish and a Mini. Pairing is automatic: connect your phone to the dish’s built-in WiFi network (the SSID is printed on the router and starts with STARLINK), open the app, and it detects the hardware immediately. Gen 2 users connect to the router’s network; Gen 3 and Mini users connect directly to the dish’s WiFi.
One practical note: you do not need internet service to complete pairing. The app works over the local connection, which means you can check a used dish, configure a bypass router, or run an alignment scan on a brand-new install before your service plan is even active.
The Alignment Tool: Where Most Installs Go Wrong
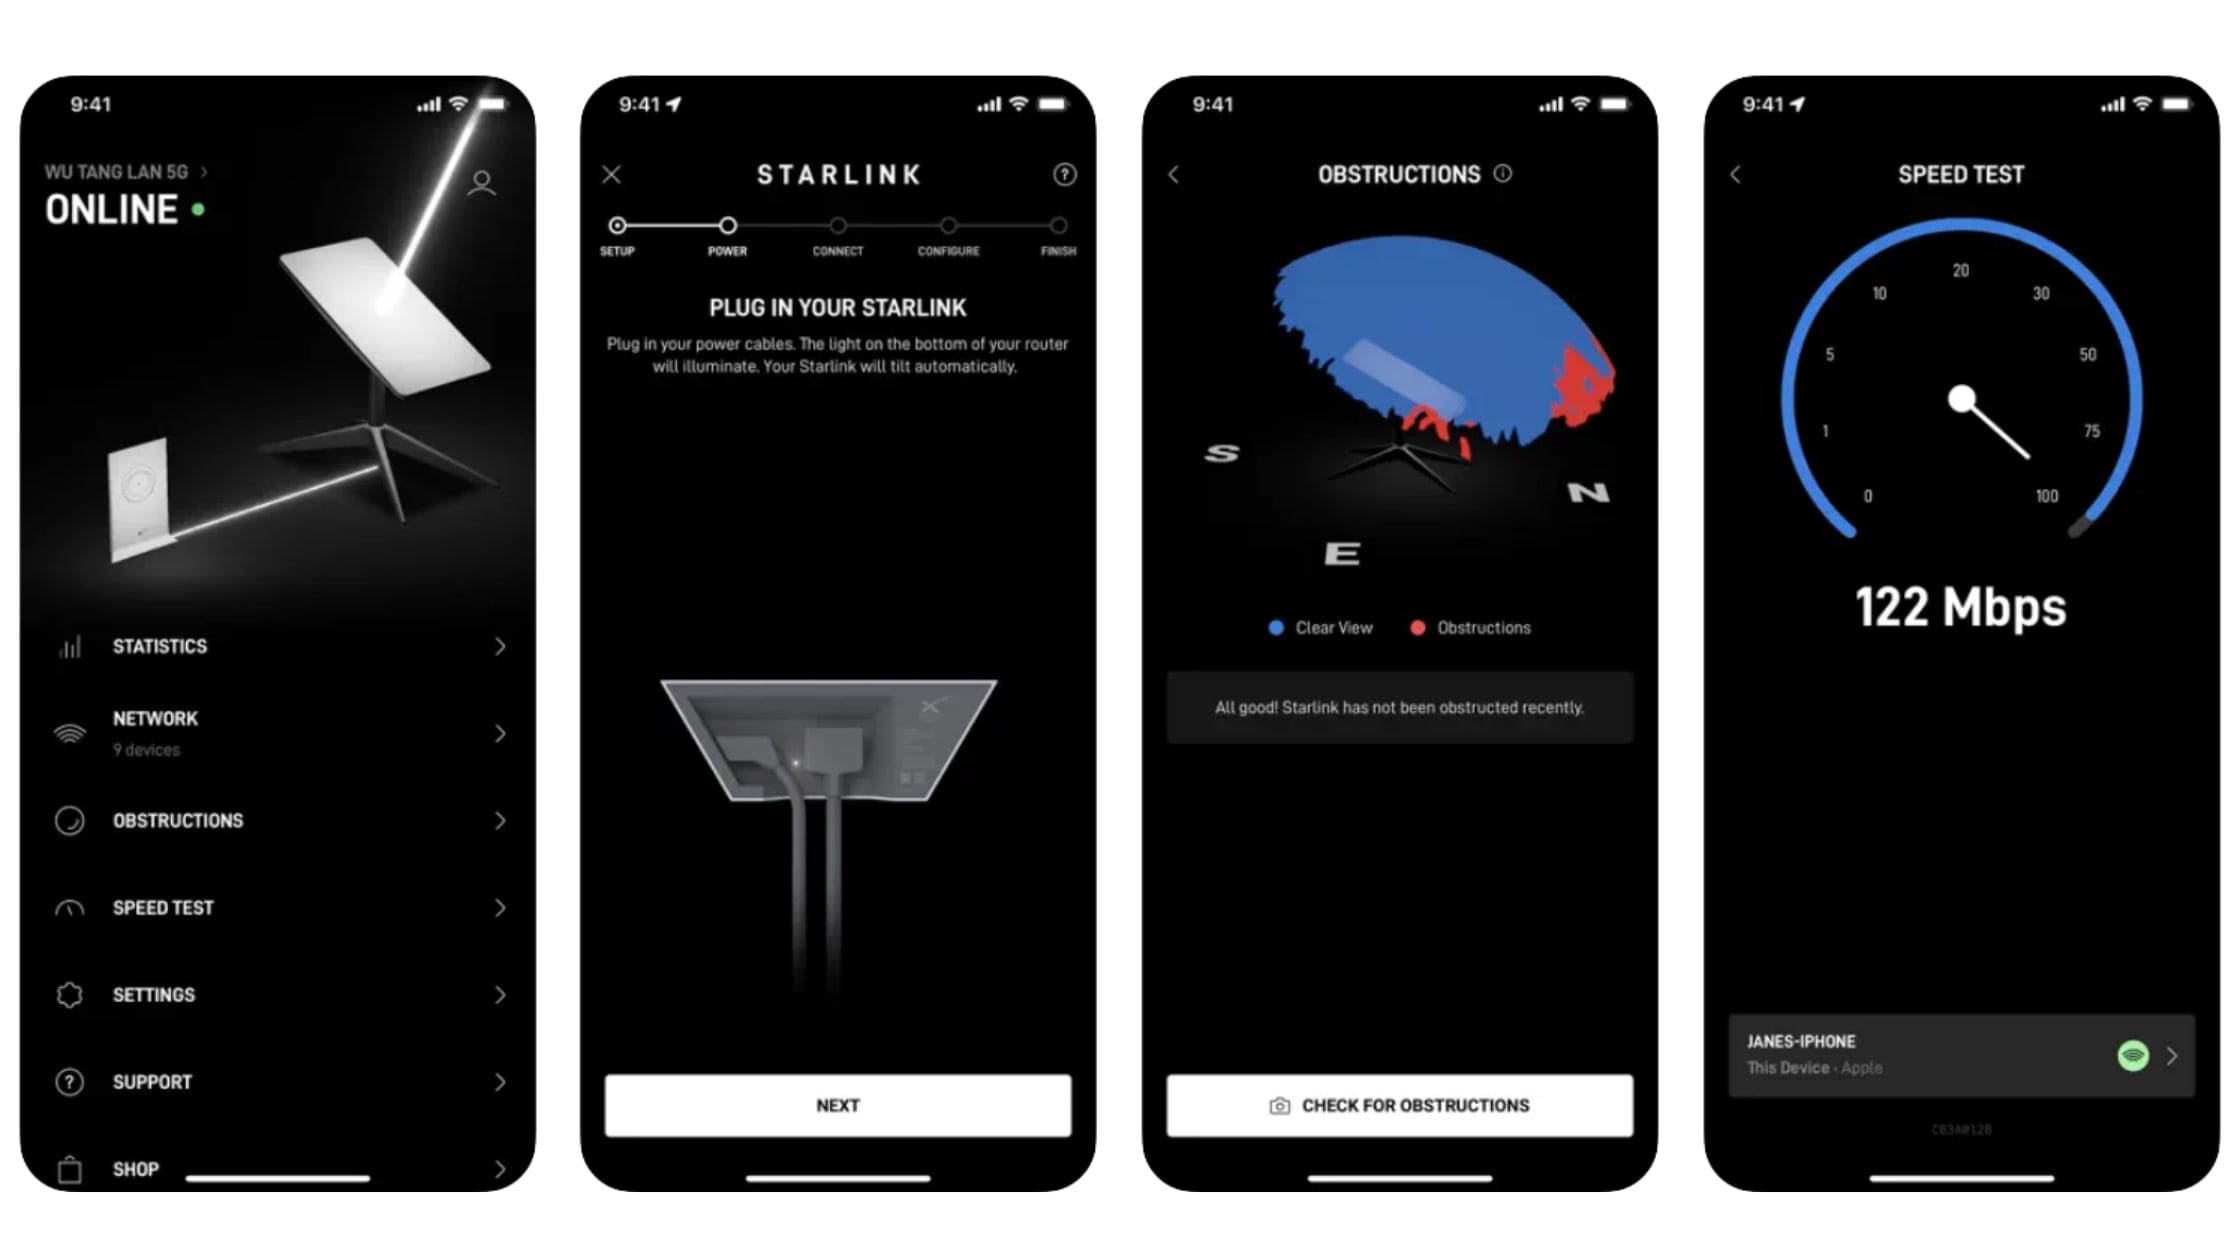
The app’s Check for Obstructions tool uses your phone’s camera and sensors to build a 3D view of your sky. Point the phone along the dish’s field of view — 110 degrees for the Gen 3 standard dish, a wider patch of sky for the flat High Performance models — and the app paints obstructions in real time: tree lines, roof edges, chimneys.
How to read the results honestly
The most common mistake is scanning from ground level and then roof-mounting the dish. Scan from the actual mounting position. Hold the phone flat against the mounting surface height — or better, clamp a phone to a pole or ladder at exactly the height the dish will sit. This is where a cheap adjustable tablet or phone stand earns its money: strap it to the ladder, lock the angle, and scan hands-free while you record the obstruction percentage.
Target numbers: anything under 1% obstruction is excellent for fixed installs. Roam users on the road can tolerate more, because moving vehicles gain and lose satellites constantly — the app simply pauses streaming during dips.
Stats Screens: What Each Metric Actually Tells You
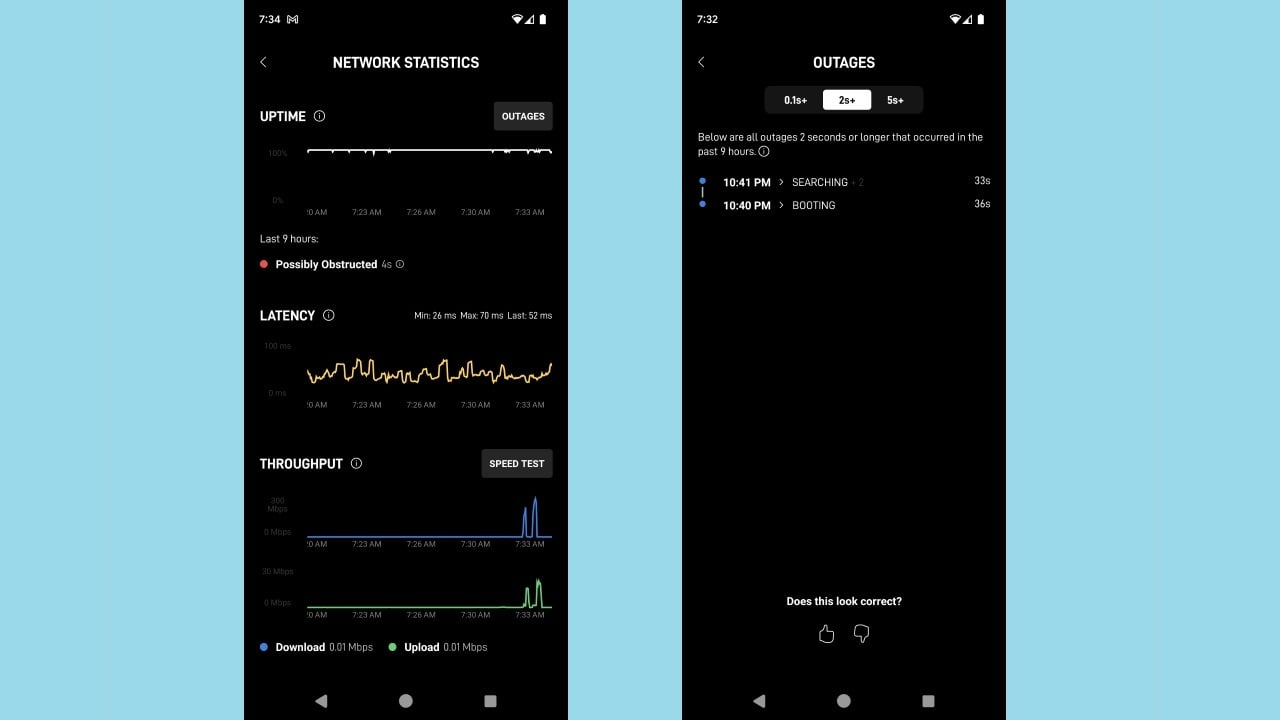
The Statistics page is dense, but three cards matter most:
- Uptime and outage chart — every drop is timestamped. If outages cluster around the same hour daily, suspect a recurring obstruction (a tree swaying into the beam at a certain sun angle) rather than satellite handoffs.
- Speed test history — the app samples throughput continuously, not just when you tap Test. Watch the trend across a week, not a single reading.
- Latency — typical median sits between 25–60 ms for the standard constellation. Sustained spikes above 150 ms usually mean congestion or an obstruction-induced reroute.
Pro move: run the app’s speed history against your power setup. If you’re running a 12V conversion or an inverter, correlation between voltage sag and speed drops is a classic under-sized-power symptom we document in our 12V DC conversion guide.
Snow Melt Controls: Three Modes, Very Different Power Bills
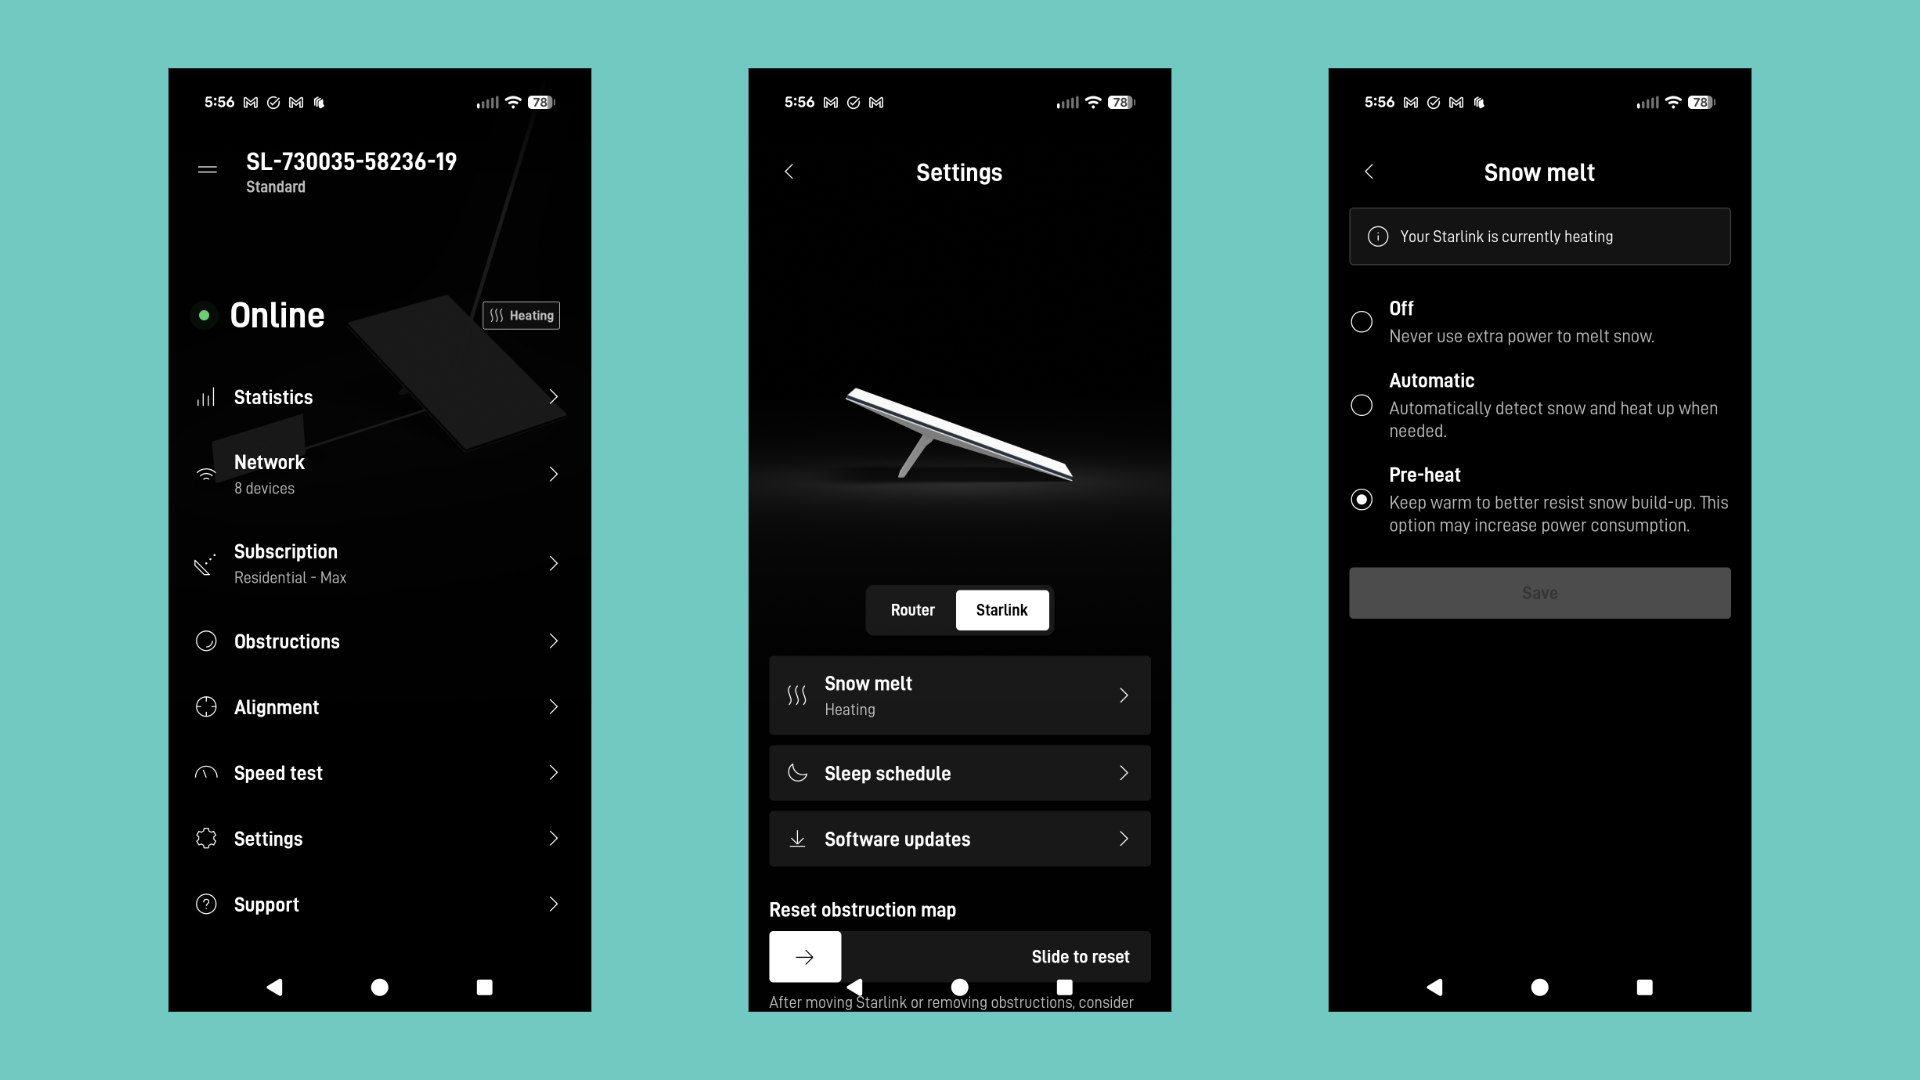
The app’s Snow Melt section is one of the most misunderstood settings in the whole ecosystem. Standard and High Performance dishes have a heated face, and the app exposes three modes:
- Automatic (default) — the dish heats when it detects snow or ice accumulation. Efficient, and right for most users.
- Standard — full-time heating during cold weather, drawing up to roughly 150W on top of normal consumption. Use it when wet, heavy snow keeps refreezing in the melt cycle.
- Preheat — schedules heating so the face is warm before a storm arrives. The off-grid crowd loves this: you burn battery during cheap generator hours instead of at 6 a.m.
If your region gets serious snowfall, our Starlink snow melt and winter guide breaks down the measured draw of each mode and the physical snow-management gear that reduces how often you need them.
Router Settings You Can Reach From the App
The app exposes the settings most users never find: Bypass mode (hands your network to a third-party router — see our Bypass mode mesh WiFi comparison), DNS configuration, band steering, and per-device priority. Gen 3 router owners also get a built-in mesh node pairing screen, which makes adding a second official router a two-tap job instead of a web-UI crawl.
Troubleshooting Flows That Actually Fix Things
The app’s support section includes automated diagnostic checks that test your cabling, router state, and dish health remotely. Before you email support or suspect a failed dish, run these in order:
- Restart the dish from the app — not by pulling power. A soft reboot preserves logs and takes 90 seconds.
- Check the cable test result — intermittent Ethernet faults on Gen 2 rigs almost always trace to the fragile connector near the dish, not the router end.
- Review the outage timeline against weather data. Confirmed constellation outages are rare; weather-related obstruction isn’t.
Accessories That Make the App Work Better
Because the app is your eyes on the system, a few inexpensive tools compound its value:
Check Price on Amazon: Tablet & Phone Stand
A rigid stand converts the alignment scan from a two-person job into a one-person job — and doubles as a monitoring station so you can keep the stats dashboard visible during a new install’s first week.
Check Price on Amazon: 65W Power Bank
Field work burns phone batteries fast — camera, GPS, and screen-on time during alignment scans are brutal. A 65W USB-C PD bank tops up the phone and a Starlink Mini simultaneously, and it’s the same bank we recommend in our Mini portable setup guide.
Verdict: The App Is the Second-Most-Important Part of the Kit
Starlink’s hardware is famously plug-and-play, but the difference between a mediocre install and a great one is almost always visible in the app’s obstruction and stats screens first. Spend an hour learning the tools in this guide before you spend a dollar on accessories — the app will tell you which dollar to spend.